In some team configurations, especially those that are new to agile, there are no DevOps principles in place, and a lack of infrastructure engineers to provide support when releasing a new version of the product.
Moreover, in larger enterprise companies which have previously been working using more traditional, waterfall methodologies, we often see information silos appear. Agile working is key to breaking down these silos, but it doesn’t happen overnight. One team doesn’t always know what another is doing; one team’s processes might be extremely beneficial to another, but they simply aren’t aware. If knowledge is not documented thoroughly, I believe it can result in confusion and inefficiency.
In this article, I’ll try to provide some tips about how to formalize the release process, particularly from the developer’s point of view.
Section 1: Software release management checklist
Section 2: Embracing best practices
Section 3: Continuous integration
Enter the software release management checklist
In this section, I’ll propose some steps you can use to build your own checklist for your release process. Some of these steps are by no means mandatory. Each app is different and each team works in a different way, so feel free to adapt and make changes that will fit better into your workflow.
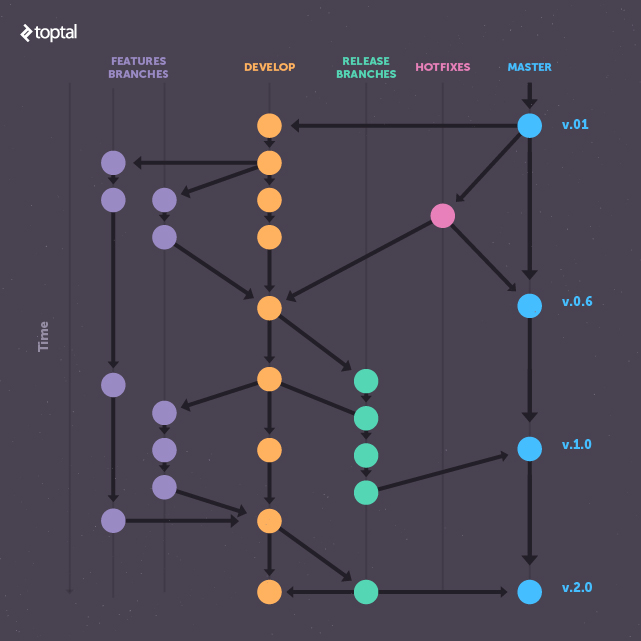
1. Create a release branch
It’s likely that you are familiar with the concept of Git Workflow, or with the idea of release branches.
Ideally, you should have at least three branches:
- master: this should reflect the current state of what is in the production environment. Every new commit on the master should comprise a new release only.
- develop: this branch should contain the completed (and tested) upcoming features. It is common to create a separate branch for each feature and then merge it to develop when the feature is ready.
- release: release branches are a collection of commits that are ready to be sent to production, plus some additional minor bug fixes related to the release.
Notice the release branches should be removed once the release is completed, therefore, these branches are created and destroyed all the time, unlike master or develop, which are always the same.
In order to create a new release branch from the develop branch in your git terminal, type:
$ git checkout -b release/x.y.z
It is convenient to use a naming convention, such as the one defined above, replacing x.y.z with the major.minor.patch version number according to your needs (it is a policy that you should define within your team and stick to it).
It is important to say, as well, that if you code some bug fixes into the release branch, you should not forget to merge them back to develop. The main purpose of the release branch is to have a preview snapshot of how the app should behave after it goes into production.
Organizing and keeping track of different release branches is a crucial aspect of release management.
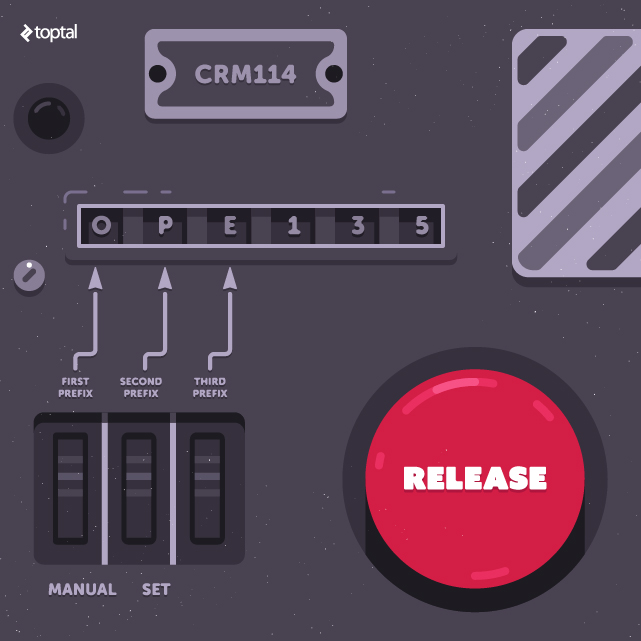
2. Bump version
The next step would be to bump (modify or increase) the version number on the release branch.
You should open the AndroidManifest.xml / package.json / pom.xml / or wherever the app’s version is stored in your project (YMMV), update the version number, and then commit the changes to the current release branch.
It is important to update the version number for two reasons.
First, you can track and map the features that were introduced in each version, and second, you will be aware of the version they are using should they need to do some troubleshooting or contact you for support. If you are building a mobile app, the version number you are updating in this step is usually displayed on the user end, in the About section or in Google Play or Apple App Store. This step is also a good opportunity to update environment-dependent-configuration files (although I’d suggest keeping those in a separate repository), such as making the branch point to the production database or any other tweaks needed in the build process.
Finally, it is recommended that you push the release branch to origin so it is available for your other developers:
$ git push -u origin release/x.y.z
3.a) Merge the release branch to the master and tag it
Only the master branch should be deployed for production, thus, in this step, we need to merge the release branch into master.
$ git checkout master

																				$ git merge --no-ff release/x.y.z

																				$ git push
The --no-ff flag is optional. However, its use is recommended in order to force the creation of a new commit object, even though the merge can be completed using the fast-forward technique.
Next, it is time to tag the release on the master branch:
$ git tag -a x.y.z -m 'description of new version, features or fixes included'
Tags are useful because you are persisting at this specific point in history in the git repository, and you can come back later to recreate a separate branch of a particular tag.
3.b) Use a pull request to merge the release branch
Another alternative used often is to use a pull request to merge the release branch into master.
There are numerous advantages to this approach. A new space is created for collaboration, which the team can use to discuss various release-related issues. This point is a good time to add an extra gate for incorporating a code review process while having more eyeballs to monitor the code that will be introduced and to discuss potential modifications.
Examples of tools that allow you to implement pull requests into your workflows include GitHub and Bitbucket. With these tools, you don’t type the git commands manually. Instead, you use a web interface to set the source branch (release) and the destination branch (master), and then you add one or more reviewers, all of whom will be able to write inline comments on these new changes, suggest improvements, and so on.
After all the reviewers approve the pull request, you can automatically merge the changes into master by simply pressing a button on the UI.
4. Deploy master to the production environment
It is good practice, at this stage, to have a tester on your team do a smoke test (this could be defined on a separate checklist) before deploying. A good suggestion is to deploy the master branch into a separate testing environment. The tester can then perform some basic actions to make sure nothing went wrong after the merge on the latest build. How to conduct a smoke test is beyond the scope of this article, but you can find a lot of material on the web about it. The result of the smoke test can be integrated into the release checklist/spreadsheet, documenting anything that went wrong.
At this point, you are ready to deploy the changes and make them live. Go ahead and deploy the master branch.
Don’t forget to make sure the deployment was successful and that everything works as expected.
5. Merge back into develop and delete the release branch
Now the release is almost completed, you’ll want to merge the release branch into develop to update the version number on the latter and to transfer all the bug fixes made to the main development branch:
$ git checkout develop

																				$ git merge release/x.y.z
Now it is time to remove the release branch:
$ git branch -d release/x.y.z
6. Changelog generation
There should be a file at the root of your project named CHANGELOG.md (or an equivalent) where you should add a new entry whenever there is a new release in order to document everything that’s included in it, like bug fixes, new features, known issues, and any other relevant information in the form of release notes. This is really useful for users and contributors to see what changes have been made between each release (or version) of the project.
The changelog entry includes the date, version number and some notes about the release. The entries should be kept in reverse chronological order. Here’s a simple template I’ve been using that you can adapt to your project:
<app's name or component released>  |

																				<developer's name in charge of release> | <developer's email>

																				Features:

																				* <ticket/issue number>: <ticket/issue summary> ()

																				* ...

																				Bugs fixed:

																				* <ticket/issue number>: <ticket/issue summary> ()

																				* ...

																				Enhancements:

																				* <ticket/issue number>: <ticket/issue summary> ()

																				* ...

																				Optional: known issues plus other release notes.
In addition, this step can be completely automated by either coding a basic script that traverses the git log and automatically generates the changelog entry. Keep in mind, though, that the degree of automation you get is directly proportional to the strictness of your commit message format. I believe it is always good practice to agree on a specific format for committing messages with the team. By following guidelines on the style of the commit messages, they will be easier to parse and hence more likely that you will be able to automate the generation of the changelog.
7. Communicate with stakeholders
The important thing here is not forgetting to communicate that a new release is available.
For example, you might let your teams know via an internal messaging tool such as HipChat that a new release has been completed. I recommend creating a dedicated room (i.e. Releases) for the sole purpose of communicating release-related events. Thanks to HipChat’s integration with dev tools like JIRA and Bitbucket, you can even set up automated alerts for this.
Alternatively, you might write a blog post (either internally, via Confluence, or on your public blog) or announce the release via social media. More actions can be taken depending on the nature of your organization.
8. Grooming the issue tracker
After a release is executed, you will probably need to update the status of some of your tickets to keep track of the bug fixes and features currently in production. Generally, this involves changing some tags (for small projects, I use a release-pending tag, which I remove after the release is completed).
If you use milestones for each new version, you’ll probably need to update their status or mark them as completed. Issue trackers like JIRA Software even let you plan the release and align it with sprints, track whether a bug is blocking a release, and provide visibility on other useful information.
It all depends on how you use the tool. I simply want to point out that the task of updating the information in the issue tracker should be included in your release checklist.
About automating the release process
You might have noticed that, apart from the changelog step outlined above, many of the aforementioned steps can be automated, too.
The ability to automate some parts of the release process is a huge win and saves a lot of time. I suggest creating scripts or figuring out how to automate individual steps and then working towards a goal of continuous delivery. This can reduce risk, reduce costs, and reduce the time developers need to spend in managing the release. Consequently, you’ll be able to release more often and be more productive in terms of the hours allocated for development.
The holy grail of DevOps is to be able to launch a new version by pressing a button (or running a command) that would trigger the release process automatically, or even better, a system that would release a new version of your software at a designated time. This is difficult to achieve because you also need to automate a lot of the testing process, but it is not impossible or as farfetched as some belief!
Embracing best practices
In this section, I’ll describe a couple of recommended practices that I’ve found convenient, either to make the release process smoother or to take safety measures in case something goes wrong.
Release on the most suitable day
I usually release apps I am working on Thursdays between noon and the close of business.
If you work Monday to Friday, it is not a good idea to launch on a Friday. If something breaks down after the release, you won’t have time to fix it until Monday (unless you want to work during the weekend). That’s why it is more convenient to do releases on Thursday; you then have Friday to monitor the new version after being deployed and to fix any problems or do a rollback if necessary.
Another important thing to know is the time zone the majority of your users are located. You should time the release during a low-traffic period to minimize the potential damage if something fails. Sometimes, this can be tricky when your user base is spread across the whole world, but it’s always best to do some research and decide on the best time.
Backup your database before a new release
If you don’t already carry out periodical backups of your database, I strongly suggest you add a step into your release process to remind you to perform a backup before starting the release.
Staged rollouts
Ever wonder why, when a publisher announces they’ve launched a new feature, it takes days, or even weeks, for that feature to be available on your phone? That’s because many companies use staged rollouts.
Facebook has been doing this for a long time. It tests a new feature on five or 10 percent of its users, gradually increasing it until they reach 100 percent of the user base. During the staged rollout phase, you’ll need to look closely at user feedback and crash reports. With this information, you can then postpone the release, or fix errors, before they affect every user.
Continuous integration
Continuous Integration is a practice worth embracing for many reasons. Firstly, it allows you to detect mistakes early, increasing the rate of successful releases. Secondly, it is the first logical step before implementing Continuous Delivery and full automation as previously described.
This is a large topic, and there are many books and blog posts about it, but I am mentioning it here because I believe it will give you much more confidence in your operations. Amongst the many advantages of using CI, you will benefit from reduced risk, increased visibility of what is working and what is not, earlier detection of bugs, increased frequency of deployments, and much more.
The starting point to implementing CI is to set up a “continuous integration server”; some nice tools to try include Bamboo, Jenkins, and Travis.
Exitlude: It will all work out
To wrap up, I would say that it’s very important to have a well-defined release process, regardless of its complexity, user base, or the size of your organization.
If you don’t, I suggest you start thinking about some basic steps, using this guide and others like it to help you brainstorm with your team to come up with a first draft. Try it out on your next release, then iterate. Eventually, you’ll end up building your own release process.
After that, start thinking about how to automate parts of the process. Think about areas that can be improved. Explore ways of reducing the release time by incorporating small optimizations. Automation should be your ultimate goal; however, don’t plan that from the start, or you will fail by attempting such a big leap. As with every process, it is better to improve it gradually.
Published: Apr 11, 2018
Updated: Jun 22, 2023